

Risolutore DNS locale con Unbound, con configurazione opzionale per endpoint DoH personalizzato (DNS over HTTPS)
DNS
Configura il resolver DNS locale.
1. Installa pacchetti
- CentOS/Fedora/RHEL: Copia
sudo dnf install unbound bind-utils - Debian: Copia
sudo apt install unbound unbound-anchor bind9-dnsutils - Gentoo: Copia
sudo emerge unbound bind-utils
2. Modifica /etc/resolv.conf
Assicurati che /etc/resolv.conf contenga le righe seguenti:
nameserver 1.1.1.1
nameserver 1.0.0.1
nameserver 2606:4700:4700::1111
nameserver 2606:4700:4700::1001
Questa configurazione temporanea ci permetterà di poter continuare ad utilizzare i servizi DNS e modificare la configurazione di unbound senza incorrere in problemi di risoluzione.
3. Modifica la config di unbound
Modifica /etc/unbound/unbound.conf, sostituendo tutto il contenuto del file con il seguente:
# https://nlnetlabs.nl/documentation/unbound/unbound.conf/
server:
	# Do not daemonize, to allow proper systemd service control and status estimation.
	do-daemonize: no
	use-systemd: yes

	# A single thread is pretty sufficient for home or small office instances.
	num-threads: 2

	# Logging: For the sake of privacy and performance, keep logging at a minimum!
	# - Verbosity 2 and up practically contains query and reply logs.
	verbosity: 0
	log-queries: no
	log-replies: no
	log-servfail: yes
	# - If required, uncomment to log to a file, else logs are available via "journalctl -u unbound".
	#logfile: "/var/log/unbound.log"

	# Set interface to "0.0.0.0" to make Unbound listen on all network interfaces.
	# Set it to "127.0.0.1" to listen on requests from the same machine only
	# "::1" is the IPv6 loopback address (same as "127.0.0.1")
	interface: 127.0.0.1
	interface: ::1

	# Default DNS port is "53"
	port: 53

	# Control IP ranges which should be able to use this Unbound instance.
	access-control: 0.0.0.0/0 refuse
	#access-control: 10.0.0.0/8 allow
	access-control: 127.0.0.1/8 allow
	#access-control: 172.16.0.0/12 allow
	#access-control: 192.168.0.0/16 allow
	#access-control: 192.168.1.0/24 allow
	access-control: ::/0 refuse
	access-control: ::1/128 allow
	#access-control: fd00::/8 allow
	#access-control: fe80::/10 allow

	# Private IP ranges, which shall never be returned or forwarded as public DNS response.
	# NB: 127.0.0.1/8 is sometimes used by adblock lists, hence DietPi by default allows those as response.
	private-address: 10.0.0.0/8
	private-address: 172.16.0.0/12
	private-address: 192.168.0.0/16
	private-address: 169.254.0.0/16
	private-address: fd00::/8
	private-address: fe80::/10

	# Define protocols for connections to and from Unbound.
	# NB: Disabling IPv6 does not disable IPv6 IP resolving, which depends on the clients request.
	do-udp: yes
	do-tcp: yes
	do-ip4: yes
	do-ip6: yes

	# deny Unbound the use this of port number or port range for
	# making outgoing queries, using an outgoing interface.
	# Use this to make sure Unbound does not grab a UDP port that some
	# other server on this computer needs. The default is to avoid
	# IANA-assigned port numbers.
	# If multiple outgoing-port-permit and outgoing-port-avoid options
	# are present, they are processed in order.
	outgoing-port-avoid: "3200-3208"

	# DNS root server information file.
	root-hints: "/etc/unbound/root.hints"

	# Maximum number of queries per second
	ratelimit: 100

	# Defend against and print warning when reaching unwanted reply limit.
	unwanted-reply-threshold: 10000

	# Set EDNS reassembly buffer size to match new upstream default, as of DNS Flag Day 2020 recommendation.
	edns-buffer-size: 1232

	# Increase incoming and outgoing query buffer size to cover traffic peaks.
	so-rcvbuf: 4m
	so-sndbuf: 4m

	# Hardening
	harden-glue: yes
	harden-dnssec-stripped: yes
	harden-algo-downgrade: yes
	harden-large-queries: yes
	harden-short-bufsize: yes

	# Privacy
	use-caps-for-id: no # Spoof protection by randomising capitalisation
	rrset-roundrobin: yes
	qname-minimisation: yes
	minimal-responses: yes
	hide-identity: yes
	identity: "Server" # Purposefully a dummy identity name
	hide-version: yes

	# Caching
	cache-min-ttl: 300
	cache-max-ttl: 86400
	serve-expired: no
	neg-cache-size: 4M
	prefetch: yes
	prefetch-key: yes
	msg-cache-size: 50m
	rrset-cache-size: 100m

	# File with trusted keys, kept uptodate using RFC5011 probes,
	# initial file like trust-anchor-file, then it stores metadata.
	# Use several entries, one per domain name, to track multiple zones.
	#
	# If you want to perform DNSSEC validation, run unbound-anchor before
	# you start Unbound (i.e. in the system boot scripts).
	# And then enable the auto-trust-anchor-file config item.
	# Please note usage of unbound-anchor root anchor is at your own risk
	# and under the terms of our LICENSE (see that file in the source).
	auto-trust-anchor-file: "/etc/unbound/root.keys"

	# trust anchor signaling sends a RFC8145 key tag query after priming.
	trust-anchor-signaling: yes

	# Root key trust anchor sentinel (draft-ietf-dnsop-kskroll-sentinel)
	root-key-sentinel: yes

	# DoH
	#interface: 127.0.0.1@4443
	#interface: ::1@4443
	#https-port: 4443
	#http-endpoint: "/dns-query"
	#http-notls-downstream: yes
	#tls-service-key: "/path/to/privkey.pem"
	#tls-service-pem: "/path/to/fullchain.pem"
Nota i parametri tls-service-key e tls-service-pem: questi due parametri indicano la chiave ed il certificato SSL.
4. Ottieni file anchor
sudo unbound-anchor -a /etc/unbound/root.keys5. Ottieni root.hints
sudo wget "https://www.internic.net/domain/named.cache" -O /etc/unbound/root.hints6. Modifica crontab
sudo crontab -e# Update /etc/unbound/root.hints every 6 months
0 0 1 */6 * wget "https://www.internic.net/domain/named.cache" -O /etc/unbound/root.hints7. Correggi i permessi
sudo chown unbound:unbound -R /etc/unbound8. Verifica funzionamento
dig @127.0.0.1 example.com +nocomments
dig @::1 example.com +nocomments
Esempio di output:
; <<>> DiG 9.20.9-2-Debian <<>> @127.0.0.1 example.com +nocomments
; (1 server found)
;; global options: +cmd
;example.com.                   IN      A
example.com.            264     IN      A       23.215.0.138
example.com.            264     IN      A       96.7.128.175
example.com.            264     IN      A       96.7.128.198
example.com.            264     IN      A       23.192.228.80
example.com.            264     IN      A       23.192.228.84
example.com.            264     IN      A       23.215.0.136
;; Query time: 0 msec
;; SERVER: 127.0.0.1#53(127.0.0.1) (UDP)
;; WHEN: (Redacted)
;; MSG SIZE  rcvd: 136
9. Modifica /etc/resolv.conf
Controlla che /etc/resolv.conf non sia un symlink:
ls -l /etc/resolv.conf/etc/resolv.conf -> ../run/resolvconf/resolv.conf/etc/resolv.conf, allora eliminalo:sudo rm /etc/resolv.confModifica /etc/resolv.conf:
nameserver 127.0.0.1
nameserver ::1
10. Rendilo immutabile
sudo chattr +i /etc/resolv.conf Se questo commando non va a buon fine, dicendo "Operazione non supportata", assicurati che /etc/resolv.conf non sia un symlink. Vedi l'avvertimento soprastante.
La prossima volta che desideri modificare questo file, assicurati di togliere l'attributo:
sudo chattr -i /etc/resolv.confUna volta terminate le modifiche, è sufficiente reimpostare il parametro con il comando precedente.
11. Abilita servizio
sudo systemctl enable --now unboundDoH
Configura il tuo endpoint DoH (DNS over HTTPS) personalizzato con nginx.
Requisiti:
- Dominio e/o sottodominio
- Porte aperte:
443(TCP): HTTP/1.1, HTTP/2443(UDP): HTTP/3 (QUIC)
1. Installa pacchetti
sudo apt install nginx python3-certbot-nginx2. Configura nginx
Crea un file di configurazione nginx vuoto in /etc/nginx/sites-enabled/doh. Assicurati che tu possa visitare il tuo sito correttamente sulla porta 80 prima di continuare.
Se non esiste, crea /var/www/html, ed un file index.html vuoto.
Modifica dns.example.com con il tuo nome di dominio.
server {
        listen 80;
        listen [::]:80;

        # Change dns.example.com with your (sub)domain
        server_name dns.example.com;

        root /var/www/html;
        index index.html index.htm;

        location / {
                try_files $uri $uri/ =404;
        }
}
3. Richiedi certificato
sudo certbot --nginx certonly -d dns.example.comSe richiesti, inserisci la tua email, e aderisci ai TOS di Let's Encrypt.
4. Configura nginx
Modifica nuovamente /etc/nginx/sites-enabled/doh:
# Insert additional DoH resolvers here
upstream dns_resolver {
        server 127.0.0.1:4443;
        server [::1]:4443;
}

server {
        # HTTP/1.1 & HTTP/2
        listen 443 ssl;
        listen [::]:443 ssl;

        # HTTP/3 (QUIC)
        listen 443 quic reuseport;
        listen [::]:443 quic reuseport;

        # Change dns.example.com with your (sub)domain
        server_name dns.example.com;

        # HTTP2/3
        http2 on;
        http3 on;
        quic_gso on;
        quic_retry on;
        ssl_early_data on;

        # SSL
        # Change dns.example.com with your (sub)domain
        ssl_stapling off;
        ssl_stapling_verify off;
        include /etc/letsencrypt/options-ssl-nginx.conf;
        ssl_certificate /etc/letsencrypt/live/dns.example.com/fullchain.pem;
        ssl_certificate_key /etc/letsencrypt/live/dns.example.com/privkey.pem;
        ssl_dhparam /etc/letsencrypt/ssl-dhparams.pem;

        # Prevent nginx HTTP Server Detection
        server_tokens off;

        # Only allow GET & POST requests
        if ($request_method !~* ^(GET|POST)$) {
                return 405;
        }

        # Limit max upload size to 1 MB
        client_max_body_size 1M;
        client_body_timeout 5s;
        fastcgi_buffers 64 4K;

        # The settings allows you to optimize the HTTP2 bandwidth.
        # See https://blog.cloudflare.com/delivering-http-2-upload-speed-improvements for tuning hints
        client_body_buffer_size 512k;

        # Allow .well-known/acme-validation
        location ^~ /.well-known/acme-validation/ {
                allow all;
                log_not_found off;
        }

        # DoH endpoint
        location /dns-query {
                grpc_pass grpc://dns_resolver;

                # Inform clients that HTTP3 is available
                add_header Alt-Svc 'h3=":443"; ma=86400';

                # HSTS
                add_header Strict-Transport-Security "max-age=31536000; includeSubDomains; preload" always;
        }
}

server {
        listen 80;
        listen [::]:80;

        # Change dns.example.com with your (sub)domain
        server_name dns.example.com;

        # Prevent nginx HTTP Server Detection
        server_tokens off;

        # Redirect HTTP to HTTPS
        return 301 https://dns.example.com$request_uri;
}
5. Configura unbound
Modifica /etc/unbound/unbound.conf, e assicurati che le seguenti righe non siano commentate:
    # DoH
	# Change dns.example.com with your (sub)domain
	interface: 127.0.0.1@4443
	https-port: 4443
	http-endpoint: "/dns-query"
	http-notls-downstream: yes
	tls-service-key: "/etc/letsencrypt/live/dns.example.com/privkey.pem"
	tls-service-pem: "/etc/letsencrypt/live/dns.example.com/fullchain.pem"
6. Riavvia servizi
sudo systemctl restart unbound
sudo systemctl restart nginx
7. Prova endpoint
Per provare il tuo endpoint, è sufficiente aprire un browser web, e configurare le impostazioni DoH. Su Firefox, ad esempio, basterà andare in Impostazioni , Privacy e Sicurezza , e scorrere fino a trovare DNS su HTTPS . Configura un nuovo endpoint personalizzato, con il seguente URL:
https://dns.example.com/dns-query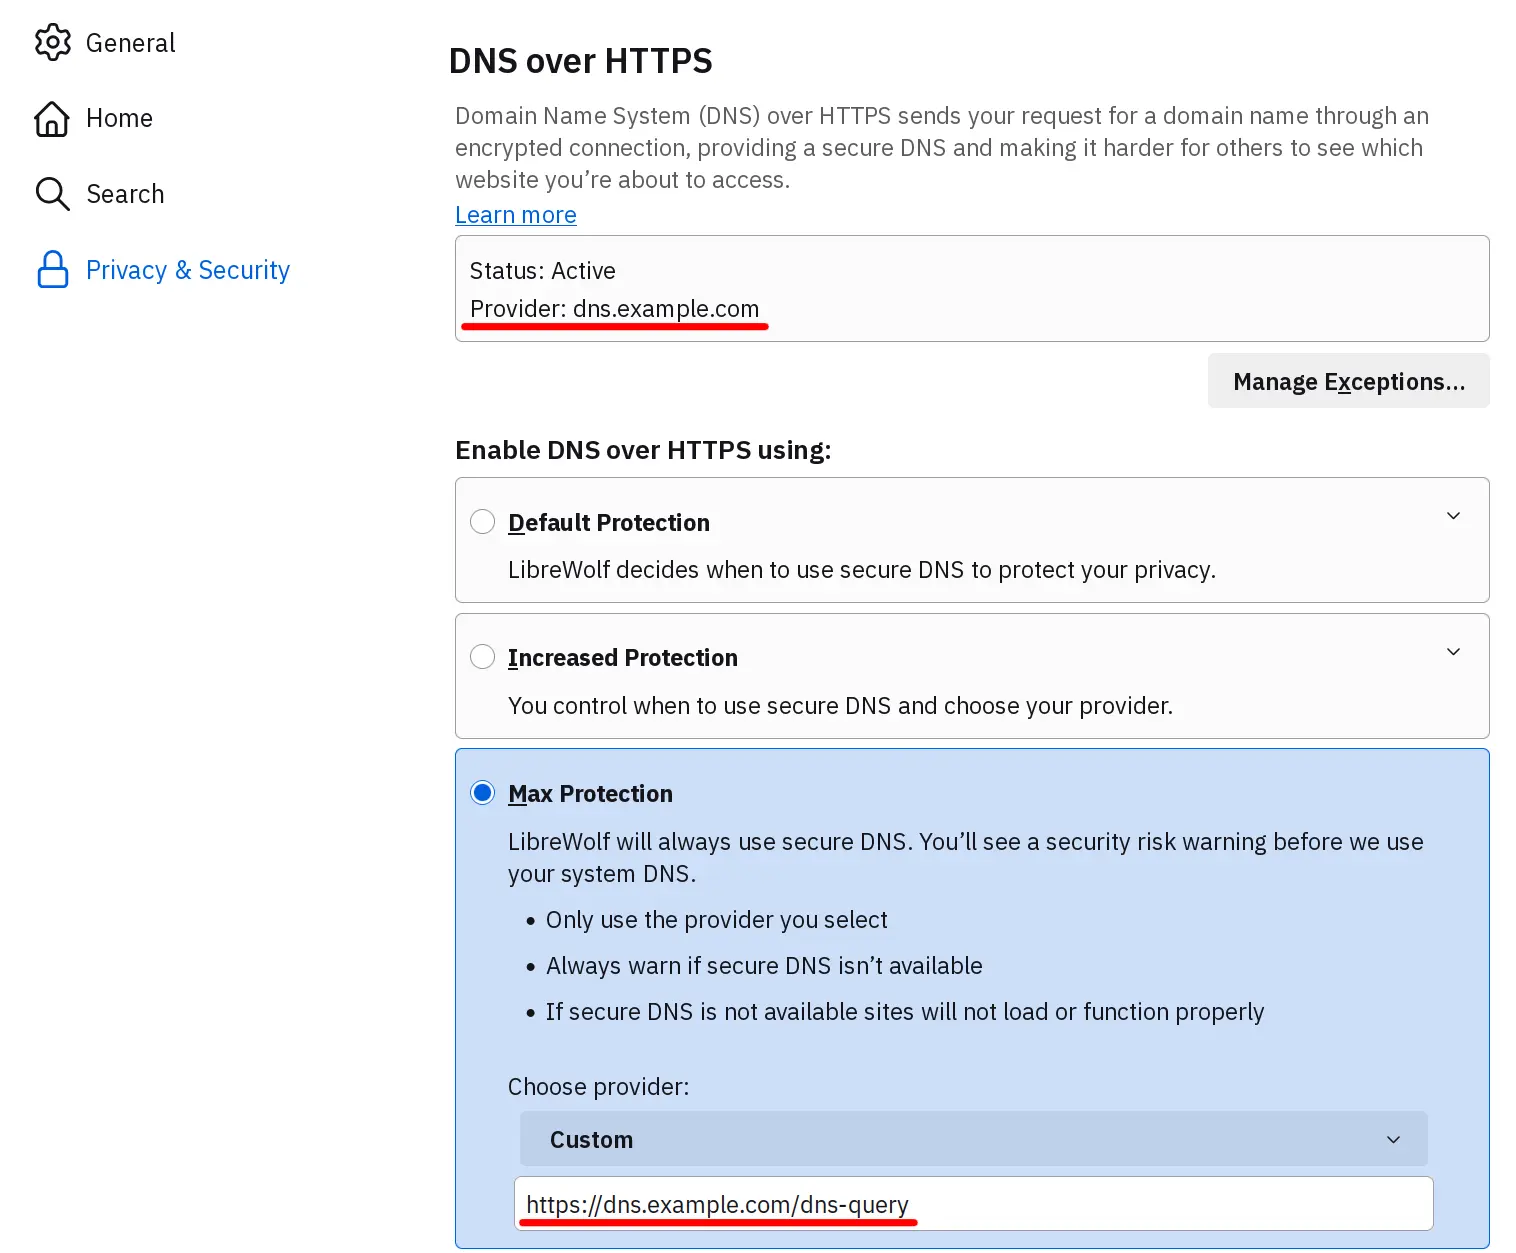
Prova a visitare qualche sito web, come example.com. Se la pagina carica, il tuo endpoint funziona correttamente! Altrimenti, verifica nuovamente la tua configurazione, e riprova.